Connecting the SDS Data Logger to a Network
Every SDS Data Logger shipped includes an Ethernet crossover cable that will connect the data logger to a network. Once the data logger is connected to a network, the SDS Reporter software will be able to find it during any searches.
Connecting the data logger to your network or directly to a PC can be accomplished using the Ethernet port on your data logger.
|
|
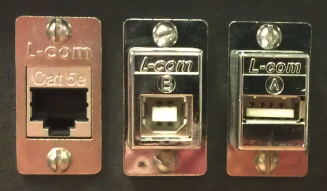
Figure 14 - Location of Ethernet and USB ports
If you are connecting the data logger to your network, you will need an Ethernet cable (the cable provided is a crossover cable for direct connections to a PC). The cable is plugged into the data logger Ethernet plug; the other end should be plugged into a network hub. If the IP Address of the data logger needs to be changed, this can be done on the data logger through the Set IP Address menu option.
If you are not putting the data logger on the network, you should use the Ethernet crossover cable that has been provided with the device. Ethernet crossover cables are most often used when connecting two Ethernet computers without a hub. An Ethernet crossover cable has its send and receive wires crossed. When using a hub or switch, this is automatically done for you.
With a crossover cable, you are forming a network between the computer that you are directly plugged into and the data logger. There will be some network settings on the data logger and on the computer that you will have to configure for the two devices to communicate.
Setting an IP address in the data logger is described in Finding and Setting the IP Address of the Color SDS Data Logger Finding and Setting the IP Address of the Color SDS Data Logger.
Network settings can be found through the Control Panel in Microsoft Windows.
Using the crossover cable will require the Local Area Connection to be modified.
In Windows Vista and Windows 7
In Older Windows Versions

